Beetlejuice
Welcome to the Beetlejuice page! This is an ugly robot that would die in the wild pretty quick! Thankfully
though, he has ME to protect him. Beetlejuice got his name after the movie because he reminds me of that
nasty looking boogieman. He's not symmetrical at all, many of the components wiggle, and he's just plain
crooked looking.
Beetlejuice - Front View
Beetlejuice is of the 1381 photopopper variety and uses a 3300uF main cap with .1uF timing caps. The sensors are
made from a spring in a pull-back toy car. I got the car in a 3-pack from the local dollar store and these things
have given me lots of good parts. Not too bad for a buck! The sensors are the first ones I ever made. If I make this type
of sensor again in the future, I will clean up the spring with some fine sandpaper before assembly. Right now, they need
to have almost all the pressure he can put on them to react properly.
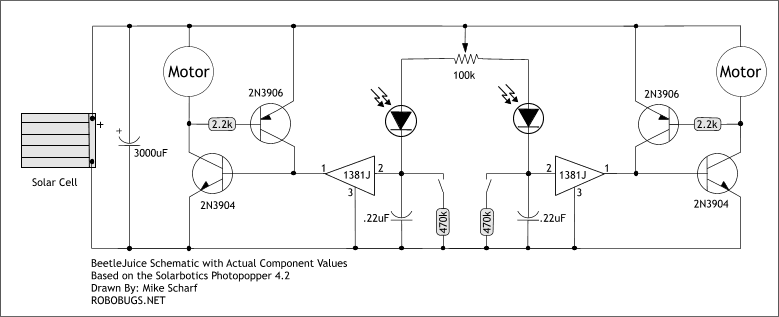
Beetlejuice - Schematic
Here is the actual schematic used in Beetlejuice. The electronics were freeformed in an unusual way
in order to make it easy to change the 1381's to different values, but I've found this to be unnecessary. I have no
plans of making this type of freeformed 1381 popper again and therefore, won't be presenting a layout diagram for it.
Beetlejuice - Side View
Notice the U-shaped arm sticking out of his side. This is the trimmer used to tune him for proper light
tracking. The wheels were made from silicone fuel tubing from a gas powered R/C car. For more info on
the wheels, visit my
Techniques section.
Beetlejuice - Rear View
Here's why Beetlejuice is so darn ugly. I wanted to try to make him in such a way that I could easily
change the 1381 triggers for different lighting conditions. It turns out that I've never had to do
a darn thing with them! The bot happily pops around under my desk lamp and doesn't lock up in the
sun. Oh well, just another design exercise.
Beetlejuice - Underside
Another clunky aspect of Beetlejuice is the fuse clip motor mounts. They are VERY nice when you don't
want to take a chance ruining your motors by soldering to them but they're heavy. I guess the added
weight would help with traction but the wheels are pretty sticky anyway. You can clearly see my solar
panel mounting method in this photo. The tactile sensors are paperclips with heat-shrink tubing on them
and then the spring and another layer of heat-shrink over that. Simple, creative, BEAM!


