Techniques
Welcome to the techniques page! On this page I will describe some of the things I do
different in the assembly of my robots. This isn't intended to teach you about
soldering and other basic things. It is meant to share some tips and tricks with you, So Enjoy!
Sticky Solar Panels
A good way to mount your solar panels without destroying them is to use servo tape. Servo tape
is a super sticky double-sided foam tape used in radio-control models. This stuff is so sticky
that you almost can't remove it. However, with some careful twisting of the two joined parts,
the tape can be removed without ruining the solar panel. I've read a bunch of articles in which
other folks have used super glue or epoxy to mount their panels. This method will certainly be
strong enough but you could easily destroy the solar panel trying to remove it. I try to make
sure my panels can easily be swapped or moved into another robot later. Another thing I try not
to do is glue the wire to the panel after soldering it on. Instead, I keep the wire as thin
and flexible as possible and mount the wire to some other nearby structural point. Solar
panels simply cost too much to take any chances on tearing them apart while replacing wires or
removing them from their mount. Servo tape can be purchased at
Tower Hobbies or other R/C stores.
Better Solar Panel Mounting
In the above section I discussed the use of servo tape for mounting solar panels in a semi-permanent
manner. This section is describes a much more solid mounting method which is still easily undone.
Some people really like the solar panels to be mounted with glue or epoxy. The downside to that method
is that the panels can easily be damaged trying to remove them. On my robots I just cut out a piece of
an old circuit board about 1/4" by 1/2" that has alot of copper on it and glue it to the back of the
solar panel. Now I can simply solder it to the frame of the robot. This way the panel can easily
be removed by melting the solder and pulling it off the frame. Even if your robot doesn't have a frame
or body made of paperclips, it is still much better to glue a paperclip to a capacitor or other solid
part and attatch the panel that way. It's generally alot cheaper to buy a new capacitor than it is a
new solar panel. There are some photos of this mounting technique in the
Ole Yeller
section for your enjoyment!
Illustration
Better Wire Mounting
My solution for those who glue their wires to the back of the solar panel is this. Use a section of an old
circuit board with a couple of wire traces on it and solder the wires from the solar panel outputs to the
traces on the board. Then solder wires from the board to your circuit. The important thing is to keep
the wires from the panel to the board as short as possible. That way there's not enough wire to get
caught on anything or to vibrate and pull the solder pads off the solar panel. Neat huh :)
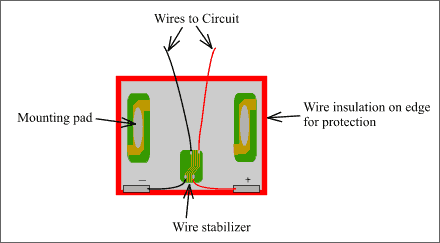
Safer Solar Panels
Solar panels have sharp edges. After all, they're glass. I like to cover these edges to prevent any chance
of getting cut. I use an x-acto knife and slice the insulation off some 16 gauge wire by slicing it along the
length of the wire. Then pull the wire out through the slice and trim the insulation to the length you need to
cover one edge of the solar panel. Use crazy glue and carefully glue this insulation to the edge of the panel.
It will take some practice to get the insulation to slip onto the edge of the panel and especially when the glue
is on it. I recommend sliding the insulation from one corner and pulling it across the edge. This only works
when actually gluing if you can do it really quick. Another thing to try is using some fine scissors to snip
a small bit off the slit in the insulation. This will open the slit up a little to ease installation. The size
and color of the wire can be suited to the color or design scheme of your robot. You can see examples of this
technique on many of my robots.
Using Glues
When building robots, the roboticist is faced with many challenges. This section deals with selecting and using
different types of glues properly and safely. The first one I'll discuss is Super Glue. This glue has a nasty
reputation for gluing your fingers together or gluing your fingers to the piece your working on. The main ingredient
in Super Glue is called Cyanoacrylate Ester. If you have trouble, as I did, even saying Cyanoacrylate, try breaking
it down like this: Cyan-o-acryl-ate. For your safety I strongly recommend checking out the Material Safety Data Sheet
(MSDS) for this chemical
HERE. I always keep a bottle of De-Bonder close at hand
when working with Super Glue. De-Bonder is available at
Tower Hobbies and
at many other hobby supply stores. In a pinch you can also use nail polish remover (with acetone in it). I use Super
Glue when building as first glue step. For instance, when I have to glue many transistors together in a block arrangement,
I'll glue them together in sets of two and then glue all the sets together.
After the glue has cured (and I unglue my fingers), I'll then use a toothpick and apply some 5-Minute epoxy in the spaces
between the transistors. 5-Minute epoxy is a much better glue for structural use. Super glue is not well suited to uneven
surfaces or small contact areas where gap filling is required. Super Glue is excellent for very clean breaks in glass
or other smooth tight fitting pieces. This is why I use it only as a way to hold pieces until I can apply Epoxy. One
of the great things about epoxy is its gap filling ability. You can fill some pretty ugly holes with Epoxy and a little
patience. You can even completely encapsulate circuits in Epoxy to prevent vibration damage or to make them waterproof
(this also makes them repairproof though).
This chemical has its precautions however, and I recommend looking up the MSDS for the specific type of Epoxy you will be
using. There are simply too many different kinds to list here. If possible, I recommend wearing thin latex gloves
whenever dealing with either type of glue discussed here and
NEVER EVER EVER LEAVE THESE OR ANY OTHER GLUES WHERE CHILDREN CAN REACH THEM! A little common sense goes a long way.
Silicone Tires
Here's a neat effective way to make tires for your robot of any size you need. First, get some silicone fuel tubing
from
Tower Hobbies or your local R/C hobby shop. Then cut a short (1/4")
length and slip it over one of your Dremel tool's straight shafts. You know, the ones used for sanding discs and
cut-off wheels? Then put on your safety glasses and turn the Dremel on. Now use some sandpaper and gently rub it
on the silicone tubing. Keep doing this until you get the desired shape on the tubing and then turn off the Dremel.
Repeat this procedure for the other wheel too. Now you have a set of miniature tires you can slip onto your motors!
Don't worry about the inside diameter of the tubing because you can always shim the motor shaft with some heat-shrink
tubing or wire insulation.
Tactile Sensors
Here's a cheap way to make tactile sensors in a pinch. Grab yourself a couple big paperclips and cut off 2 pieces
about 1 1/2 inches long. Now take some heat shrink tubing that fits the paperclip and cut off 2 pieces about 3/8"
long. Now, slip the heat-shrink tubing over the paperclip and heat it up. Don't worry about the position of the
tubing at this point. We want it to still slide so we can set-up the sensor later. Now get some flat spring material
from a pull-back toy car or some old wind-up toy (not your kids toy though!!). Take the wire and cut and bend it into
the shape you want leaving about 1/2" for attachment to the paperclip. Now find some larger heat-shrink that will fit
over both the paperclip (with HS tubing on it) and the flat spring material. Cut off a couple pieces about 3/8" long.
Now solder your wire to the end of the spring material where you will make the electrical connection and lightly sand
the area of the spring that will contact the end of the paperclip. Ok, are you still with me here? Now, shrink the
tubing over the paperclip and spring together being careful not to burn your fingers. The spring and paperclip should
not be touching. That's pretty much it! To tune the sensitivity of your sensor, just slide the paperclip in and out
of the tubing until the spring is almost touching it. When you get it dialed in the way you like it, you can apply
a small drop of superglue to the tubing and paperclip to keep it in position. The paperclip can easily be soldered
directly to the frame of your robot for solid mounting!
One more note about tactile sensors. If you make the standard small spring type of sensor typically used, find yourself
some old push-button pens. I have found that these springs are the easiest to solder to.
Easy Chip Stacking
If you need to stack your chips for more power handling, you shouldn't need to solder each and every pin to pin contact.
That much soldering could cause premature chip failure if you're not careful or you get in a hurry. Instead, simply squeeze
the pins together just slightly, press fit the chip onto the first chip, and solder the diagonal corner pins.
You should choose the diagonal corners that are the power supply pins. Even though the pins are not all soldered, you should
get many years of reliable service.