
In this section, I will share projects at various stages of completion with you. Some may be done soon, others may never be completed. The main thing here is that each of these projects needs some special something to help it along. I invite YOU to offer up suggestions, comments, or technical help with any project you see on this page. Just check it out and see what inspires you!
.jpg) This is Mark Tilden's Original Turbot 1.0
This is Mark Tilden's Original Turbot 1.0
.jpg) And this is the frame for my version.
And this is the frame for my version.
Looks pretty cool huh?! I keep catching myself staring into the framework....hypnotized by the....uh...shape. or somethin'. In short, I LIKE IT!
This project is sitting around waiting for some SERIOUS mechanical creation and circuitry. As you can see, it is only an outer frame right now and will require several more long periods of development to complete. I don't look for this to be a very "smart" robot, but rather a stupid tumbling robot which is more active in bright light and exibits a sort of Brownian Motion.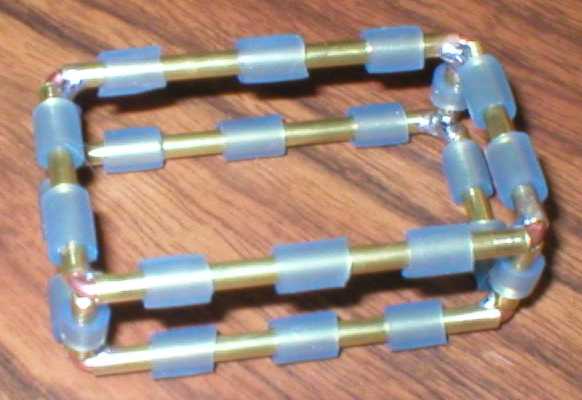
.jpg) For this blinky box to be complete, it will probably require a miracle. I need a circuit which can blink 6 blue LED's in sequence or
in pseudo-random fashion for at least a few hours after the sun goes down. The circuit needs to work well with extremely slow changing
light conditions. It also has to use 2 Solarbotics Sunceram Solar Cells generating approx 3v at 25mA when combined in parallel. The
storage is open for discussion as long as it can be charged in indirect sunlight for about 10-12 hours and reach full charge. The main
trick in this circuit will be creating the high voltage necessary to operate this many blue LED's for such a long duration. It would be nice
if the circuit would cut-off the operation of the lights/drive circuitry when the power storage drops below the point at which it can produce
nice light effects.
As you can see, the "Vegas Coffin" is going to require some expertise and experimentation to complete. At least I have a name for it, which
was thought up by my good friend Dan Gonzales. Thanks Dan! With a name like that, now I'll HAVE to finish it!
For this blinky box to be complete, it will probably require a miracle. I need a circuit which can blink 6 blue LED's in sequence or
in pseudo-random fashion for at least a few hours after the sun goes down. The circuit needs to work well with extremely slow changing
light conditions. It also has to use 2 Solarbotics Sunceram Solar Cells generating approx 3v at 25mA when combined in parallel. The
storage is open for discussion as long as it can be charged in indirect sunlight for about 10-12 hours and reach full charge. The main
trick in this circuit will be creating the high voltage necessary to operate this many blue LED's for such a long duration. It would be nice
if the circuit would cut-off the operation of the lights/drive circuitry when the power storage drops below the point at which it can produce
nice light effects.
As you can see, the "Vegas Coffin" is going to require some expertise and experimentation to complete. At least I have a name for it, which
was thought up by my good friend Dan Gonzales. Thanks Dan! With a name like that, now I'll HAVE to finish it!
Brass Walker Frame
.JPG)
.JPG)
.JPG) It took alot of time to modify the motors to mount to the frame. They come with 2 small screws holding a plate that held
them in place in their original application. I modified the mounting plate and sandwiched a piece of brass plate between
the original plate and the motor body. I had to do this because I couldn't find nuts and screws to fit this tiny application.
It is a very solid and secure set-up that should provide good reliability and long life for this walker.
It took alot of time to modify the motors to mount to the frame. They come with 2 small screws holding a plate that held
them in place in their original application. I modified the mounting plate and sandwiched a piece of brass plate between
the original plate and the motor body. I had to do this because I couldn't find nuts and screws to fit this tiny application.
It is a very solid and secure set-up that should provide good reliability and long life for this walker.
2 Wheeled Platform

.JPG) The switch is held in place with servo tape and a screw pushing it into the tape for a secure mount. The tail "wheel" is a
piece of small music wire held between the upper and lower plates with locking collars. It is shaped like a "J" and swivels
freely. I made the front with a large plate to make mounting touch switches and other sensors very easy.
The switch is held in place with servo tape and a screw pushing it into the tape for a secure mount. The tail "wheel" is a
piece of small music wire held between the upper and lower plates with locking collars. It is shaped like a "J" and swivels
freely. I made the front with a large plate to make mounting touch switches and other sensors very easy.